Table of contents
- Version documentalist
- Version realisation
- Upgrade Motivation
- Comment
- Detailed staff
- Electronic equipment list
- Work related information
- Useful links on Brahms
- Instructions
- Quick start:
- This max patch simulates a 16th-tones piano with resonators. The mix between the sampled piano and its resonances should be carefully adjusted (see the calibration and tests section below).
- AUDIO and MIDI Setup:
- Software installation
- System calibration and tests
- MIDI tests
- Audio Tests
- Locate the piano sound in space
- Balance between Pianos and Resonances
- The 16th-tone Piano
- Adjustment of the resonances parameters
- Quick test - Playing the Piece:
- Patch presentation ( Tom Mays )
- Patch presentation - Audio Configuration
- Patch presentation - SAMPLER Configuration
- Patch presentation - Details of Main Patch
- Patch presentation - LEVELS Configuration
- Patch presentation - MIDI Configuration
- Patch presentation - RESONATORS Configuration
- Patch presentation - Display Window
- Patch presentation - MIDI keyboard Input Displays
- Patch presentation - Interactive Panel
- Patch presentation - Audio
- Patch presentation - Velocity Correction
- Patch presentation - Sample Keygroup Editor
- Details - About the pedals
- Program note
Documentation date: 13 mai 2014
Version state
Valid
Validation date: 1 juin 2018
Version documentalist
- pages (pages@ircam.fr)
Version realisation
- Tom Mays (Computer Music Designer)
Version length
15 mnUpgrade Motivation
Documentation update.
soundfiles converted from sdII to aiff.
Comment
Not tested in concert
Other version(s)
Detailed staff
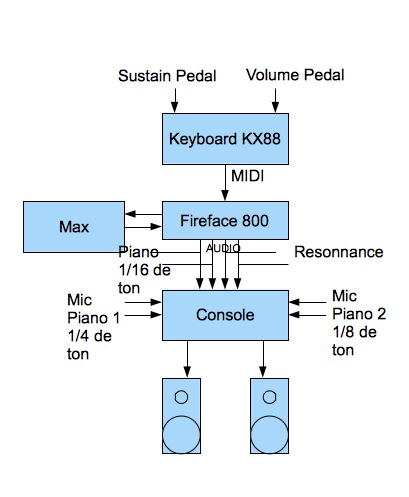
- flûte (aussi flûte piccolo, flûte alto), clarinette (aussi petite clarinette), 2 pianos, violon, violoncelle
Electronic equipment list
Computer Music Equipment
-
1 MacBook Pro - Apple Laptops
(Apple)
OSX 10.6.8 -
1 Max/MSP - Max
(Cycling74)
Tested on max 6.1.6 (not compatible with max 7) -
1 Fireface 800 - Sound Board
(RME)
-
1 KX 88 - MIDI Keyboard
(Yamaha)
Or Kurzweil PC88 [Heavy touch] [88 keys] -
1 Footswitch / Sustain Pedal - Footswitch / Sustain Pedal
optional (?) -
1 Volume Pedal - Volume Pedal
Plugged in the keyboard
Audio Equipment
-
4 Microphone - Microphone
2 for each piano (Ex.: AKG C451 or KM 140) -
1 Amplifier - Amplification
-
2 Loudspeaker - Loudspeakers
Stereo, in front of the audience -
1 Mixing Console - Mixing Console
4 line inputs (max dacs), 4 microphone inputs, 2 Outputs (stereo), stereo reverb
Work related information
Premiere
- 11 juin 1993, France, Paris, Maison de Radio France
Publisher :
- Lemoine
Realisation
- Tom Mays
Work length
- 10 mn
Useful links on Brahms
- Rebonds pour ensemble (1992-1993), 10mn
- Michaël Levinas
| File | Author(s) | Comment | |
|---|---|---|---|
| Download [7,2 Mio] | Score Rebonds | Levinas/Lemoine | |
| Download [39,1 Mio] | Patch Rebonds2013.dmg | TomMays/Sandrine Pages | |
| Download [171,9 Mio] | Audio file(s) Record | Ensemble L'itinéraire/aeon |
Instructions
Quick start:
This max patch simulates a 16th-tones piano with resonators. The mix between the sampled piano and its resonances should be carefully adjusted (see the calibration and tests section below).
AUDIO and MIDI Setup:
Software installation
Download Rebonds2013.dmg on your computer. Open it. Copy the Rebonds folder in your computer.
Open Max 6 and choose .../Rebonds/lib in Options/Files Preferences
0pen Rebonds2013.maxpat
Check that there is no warning in the max windows, if it’s the case, correct the path in Files Preferences, close the patch and restart from step 2_._
Double click on p config and choose your audio and MIDI configuration (see below : “Patch Presentation - Audio configuration).
<span style=”font-size: 18px; font-weight: 500; line-height: 19px; font-family: “Helvetica Neue”,Helvetica,Arial,sans-serif;”>Initialization routine
When you open the patch:
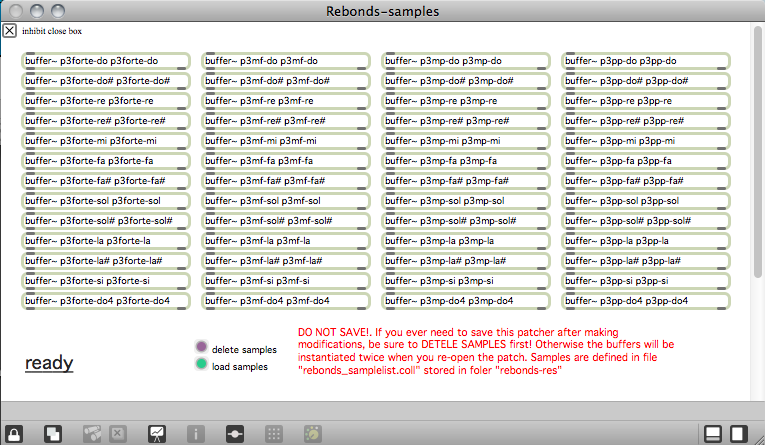
1) Click on Load samples (to be done only once in each session)
The window Rebonds-sample go in front of the screen and the buffer~ objects appear:
Click on Init on the main window
Click on DSP on/off on the main window
System calibration and tests
MIDI tests
After the setup process, test the MIDI input sent by keyboard to the subpatcher “Display>MIDI keyboard input display”.
Check:
- sustain pedal
- volume pedal
- program change buttons
- pitch bend controler
- keys
If you have any further problems, check the MIDI configuration in the window configuration.
Don’t forget that the keyboard should be on MIDI channel 1.
Audio Tests
Activate the toggle DSP on/off and play some notes with the keyboard
If you notice too much latency, adjust the value of the I/O vector size option (Cf.: Patch Presentation - Audio configuration, below).
Locate the piano sound in space
To make the setup easier, set the autoplay in the Interactive panel to 1 and the velocity to 70
In the mixer device cut the volume of the resonators
The stereo image of the direct piano must be as wide as possible (low notes to the left, hight notes to the right). Use pan and speaker position to give the feeling that the piano sound is coming from the KX88
The piano sound must not be “attached” to the speaker! In this diagram, the distance between the 2 speakers is used to create a wide virtual space. The main purpose is to simulate an acoustic piano mixed with the 2 other pianos
Balance between Pianos and Resonances
1. Set the level of the resonance to a minimum 10 or 11 seconds. The effect must be heard but subtle. You should not hear a “Lost in Space” effect ! In the Interactive panel, disable the autoplay. Play any sample from the MIDI keyboard, the sound must disappear after 7 seconds and the resonators continue for 3 or 4 seconds more. If the durations are too long or if you have the impression of hearing “Star Wars”, decrease the level of the resonances.
Staccato notes can be simulated by activating the toggle sampler/res sustain of the interactive panel.
2. The panoramic of the resonances to 180° or little more. (???)
The 16th-tone Piano
Adjust the 16th-tone piano to balance it with the acoustic pianos
1. Set the acoustic pianos mics to have a good amplification in the speakers used by the 16th-tone piano. Use similar pan.
2. Play the 16th-tone piano with the other; then with the two pianos simultaneously. At the same time, set the direct piano output equalizer parameters to produce a “spatial and timbral/harmonic” mix. Play especially tremolo, sostenuto around the F (middle of the 1/16 of a tone piano)
3. Adjust the location of the speakers and the panoramics if necessary
Adjustment of the resonances parameters
If the sound of the resonances is too poor, you can change them. Open the sub-patcher config>RESONATORS
To save the modifications, click on the button “store user preset” in the part RESONATORS - presets
Quick test - Playing the Piece:
After the initialization routine:
press any note on the keyboard. If the signal is sent to the mixing consol, that means it works.
test the pedal
The patch is ready !
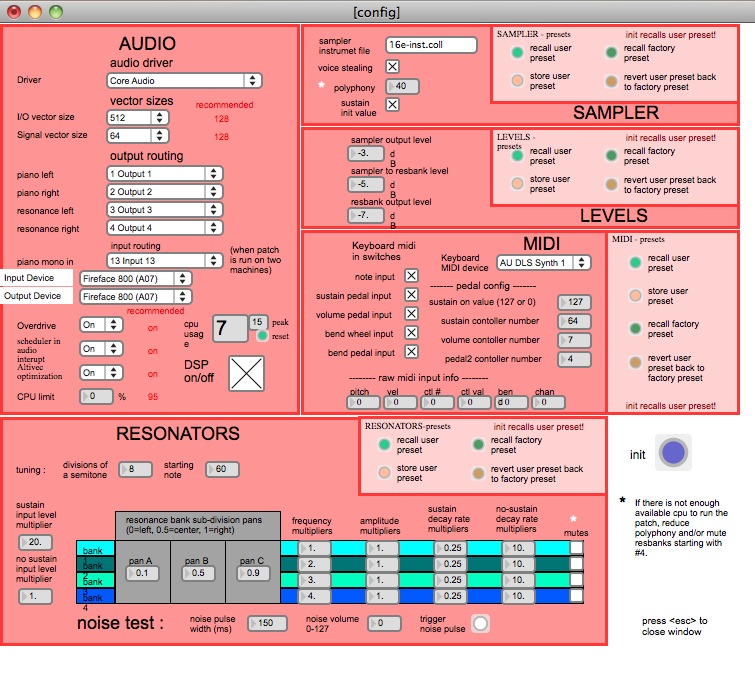
Patch presentation ( Tom Mays )
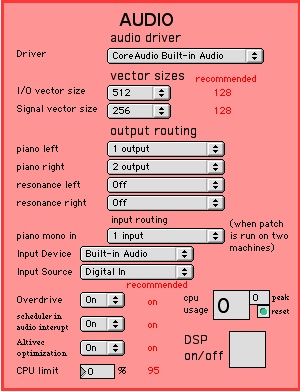
Patch presentation - Audio Configuration
The menu Driver allows you to choose the appropriate sound board driver
Set I/O vector size to 128. If you hear some clicks, increase the value to 256 or 512 (the higher the value, the bigger the latency)
Set Signal vector size to 128
Output routing: choose in the menu the physical outputs for each channel (piano left, piano right, resonance left, resonance right)
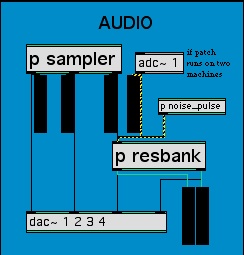
Piano mono in allows you to receive the sound of an other piano sent by another computer. (Use it only if you a configuration with 2 computers)
Prioritize MIDI: During the tests, this option gives better results when it is set on off
Overdrive: set it to on to have good event synchronization
Scheduler in audio interupt: control synchronization. Set it to on
Altivec optimization: set it to on
CPU limit: set the value to 95
Cpu usage: displays the CPU load and peak
DSP on/off: activate/desactivate the digital signal processing
All changes are stored automaticaly in the preferences of the application
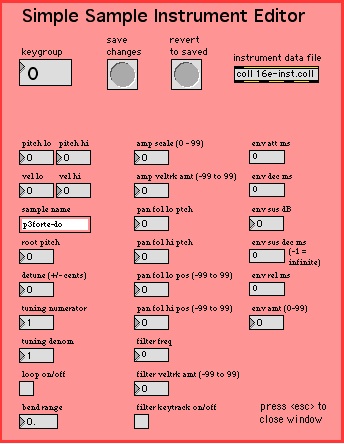
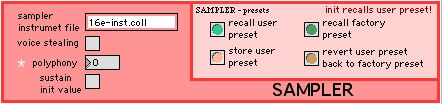
Patch presentation - SAMPLER Configuration
Sampler instrument file: name of the file defining all keygroups
Voice stealing: should be activated
Polyphony: number of samples played simultaneously. Can be reduced to 32 but 40 is good minimal value.
Sustain init value: to disable the sustain, desactivate the toggle
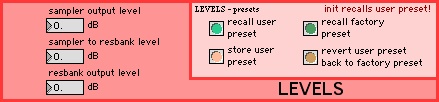
SAMPLER - presets:
Recall user preset: load user presets loading at each patch initialization
Recall factory preset: load factory or default presets
Store user preset: allow you to valid and store any changes
revert user preset back to factory preset: replace user presets by factory ones
Patch presentation - Details of Main Patch
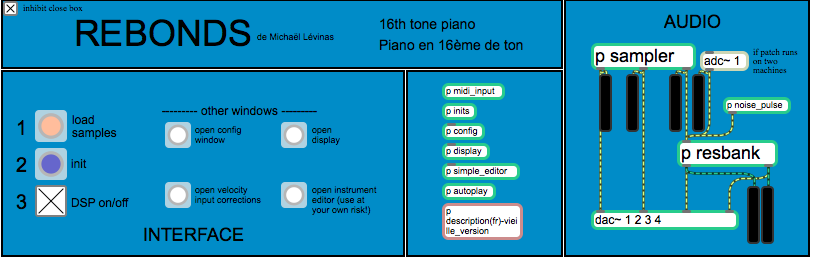
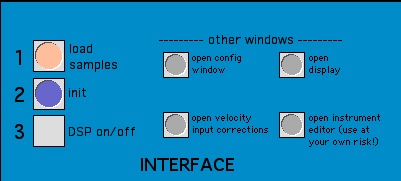
INTERFACE
load samples is used to load audio files
init is used to initialize the patch
DSP on/off allows you to activate/desactive the signal processing
the sub-part other windows give access to other setup and displays
AUDIO
The AUDIO part is composed of a sampler, filter bank (“resonators”) and outputs.
Use the vu-meters to control the levels during the performance.
Patch presentation - LEVELS Configuration
Sampler output level: direct piano outputs levels
Sampler to resbank level: level of the piano outputs linked to the resonators (in dB)
Resbank output level: resonances outputs levels (in dB)
LEVELS - presets (cf. SAMPLER Configuration)
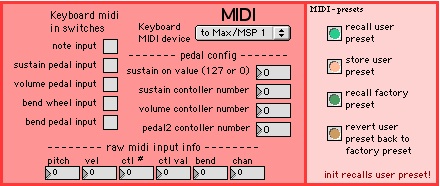
Patch presentation - MIDI Configuration
Note input: activate/desactivate MIDI note inputs
Sustain pedal input: activate/desactivate sustain pedal input
Volume pedal input: activate/desactivate volume pedal input
Bend wheel input: activate/desactivate pitch wheel input
Bend pedal input: activate/desactivate the pitch bend pedal input
Keyboard OMS device: choose appropriate OMS device system (not available in Mac OSX version)
Sustain on value: value sent when the pedal is pressed
Sustain controller number: number of the MIDI control of the sustain pedal
Volume controller number: number of the MIDI control of the volume pedal
Pedal2 controller number: number of the MIDI control of the pitch bend pedal
Raw midi input info: display MIDI messages sent by the keyboard
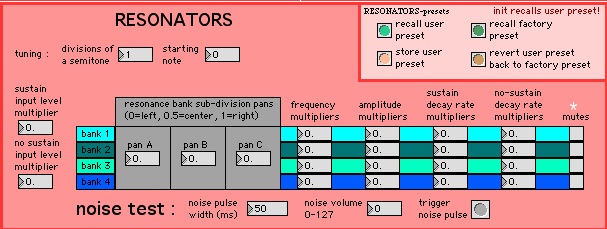
Patch presentation - RESONATORS Configuration
Tuning: resonators are tuned with the samples (in 16th-tone)
divisions of a semitone: 8 division of the half-tone
starting note: 60 for central C
Sustain input level multiplier: 20, when sustain is activated the resonances are longer so you will need more volume
No-sustain input level multiplier: 1, when sustain is disable the resonances are shorter so you will need less volume
Resonance bank sub-division pans: each bank of resonators is composed of 3 parts to create 3 panoramic positions
Frequency multipliers: each bank is related to an harmonic range on the piano (Frequency multiplier = harmonic)
Amplitude multipliers: amplitude of each bank
Sustain decay rate multipliers: coefficient of decay of the resonators during the sustain
No-sustain decay rate multipliers: coefficient of decay of the resonators without sustain
Mutes: each bank can be stopped to get more CPU load. If you use a powerful macintosh you can activate all 4 banks (desactivate the toggle mutes)
Noise test:
noise pulse width: timing in millisecond of the noise pulse
noise volume: volume of the noise
trigger noise pulse: click here to activate noise pulse in the resonators
RESONATORS - presets (cf. SAMPLER Configuration)
Patch presentation - Display Window
In the INTERFACE part of the main window, click on the “open display” button .
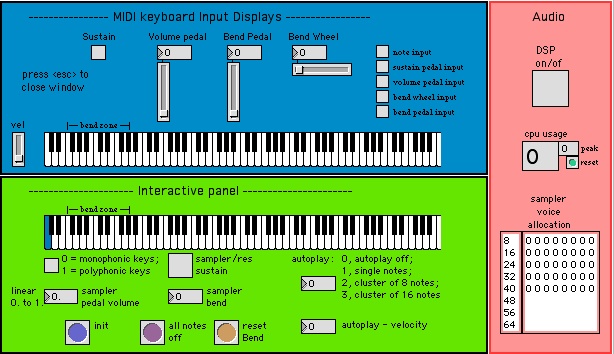
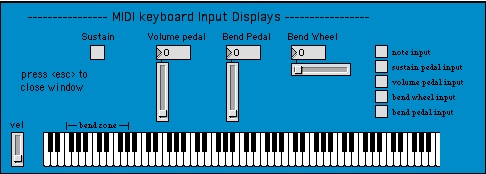
Patch presentation - MIDI keyboard Input Displays
Look at the MIDI messages sent by the keyboard (sustain, volume, bend pedal, bend wheel, velocity, pitch)
Right toggles activate or desactivate each relative MIDI input (type)
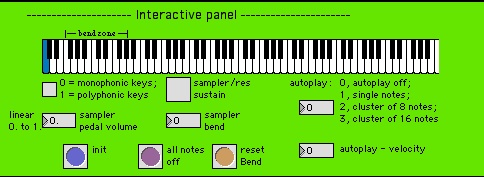
Patch presentation - Interactive Panel
Keyboard: to play piano with the mouse
Monophonic keys / polyphonic keys: to get polyphonic / monophonic effect
Sampler/res sustain: activate/desactivate sustain for the sampler and the resonances
Sample pedal volume: volume of the piano (between 0.0 and 1.0)
Sampler bend: pitch bend of the sample (0-127, 64 = default value)
Autoplay modes are
0, desactivate autoplay
1, individual notes
2, clusters of 8 notes
3, clusters of 16 notes
Autoplay velocity: volume of the “auto-activated” notes
INIT: initialize all parameters
All notes off: cut volumes of all played note and resonances
Reset Bend: set the default value (64)
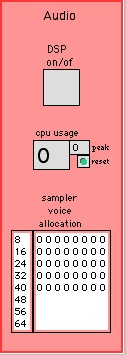
Patch presentation - Audio
DSP on/off: activate/desactivate audio signal processing
Cpu usage: display CPU load in percent
Display the number of free voices and their allocation(1 = busy, 0 = free)
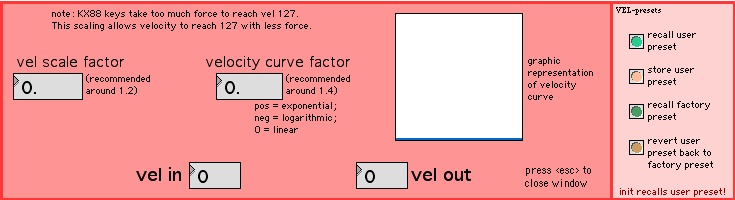
Patch presentation - Velocity Correction
In the INTERFACE part of the main window, click on the velocity input corrections button.
The response curve of the velocity has been set to have the best response from the KX88 keys. This should allow you to play pianissimo, then increase to 127 without pressing the keys too hardly.
Vel scale factor: muliplier factor of volume values where 1 = no change (default = 1.2).
Velocity curve factor: curve definition. Positive for exponentiel, negative for logarithmic (default = 1.4).
VEL - presets (Cf.: SAMPLER Configuration).
Patch presentation - Sample Keygroup Editor
In the INTERFACE part of the main window, click on the “open instrument editor” button
Details - About the pedals
Look at the 16th-tone Piano part of the instruction Setup
Volume
To have optimum control of the dynamic on this piano, a volume pedal has been added. The performer must adapt his style to the sensitivity of the pedal to find the dynamic of this piece.
Bend
In this version, the sampler is integrated in the patch. That allows you to activate the pitch bend only for certain keys of the keyboard. There is a bend zone in the left part of the keyboard (between F1 and G#0).
The Bend pedal works only in this area. This allows you to play as far as the bass C by pressing slowly the pedal, leave the pedal pressed, then continu to play in the right side of the keyboard.
At the end of the resonance time of the note, release the pedal. In this way, medium et treble notes are not affected by the pitch.
This requires all the attention of the performer!
Pitch Bend
This works with the same principle. But the initial position and value is set to the middle.
Sustain
The sustain is used continuously. The patch implement this functionality (cf. toggle sampler/res sustain locate in display>Interactive panel ).
© IRCAM
This documentation is licensed under a Creative Commons Attribution-NonCommercial-NoDerivatives 4.0 International License.
Program note
Rebonds est fondée sur le principe de la superposition de trois modes écrits pour trois pianos accordés différemment : l'un sur le principe du tempérament, l'autre en relation de quarts de tons et le troisième en seizièmes de tons. L'intérêt de ces superpositions ne se résume pas à l'utilisation paradoxale des battements. Ce qui me semblait essentiel était la relation enharmonique des différents modes qui provoque lors de la rencontre micro-intervallique des unissons et des battements complexes.
Rebonds utilise deux principes d'écriture. Le premier élucide la signification du titre : il s'agit d'une polyphonie par rebondissements à l'unisson de lignes écrites en canon selon les principes que j'ai déjà développées dans [work:10024][Préfixes] et dans mes [work:10031][Trois études pour piano]. Le second principe est celui de l'ornementation. Le piano en seizièmes de tons ornemente des unissons de la flûte, du violon, du violoncelle et de la clarinette.
La forme de l'œuvre est conçue en boucle fermée ou spirale. Le système tournoyant qui se referme donc sur lui-même procède de la superposition des modes micro-intervalliques. La forme n'est donc pas conçue comme une évolution directionnelle mais comme un système clos.
Michaël Levinas.
Version documentation creation date: 12 décembre 2013 05:55, update date: 6 mai 2021 15:09